Hacking WorkFlowy formatting with Stylish
Use a well-known Chrome extension to add new functionality via custom CSS styles


Intro
As of June 2021 WorkFlowy didn't have any way to colorize text, however using a browser extension called Stylish and some clever targeting of built-in HTML – it is actually possible – and even has a great UX.
Implementation
How it works
WorkFlowy works by rendering the text you enter in [contentEditable] elements as pure HTML, with italic, bold and underline formatting stored in <i>, <b> and <u> tags respectively.
As the underline format is rarely used, we can take some artistic license and reserve the <u> tag to be used as a styling hook to implement custom formatting using Stylish.
Additionally:
- combining underline, italic and bold we actually get four possible combinations of formatting
- the user can use the system shortcut keys
Cmd+U,Cmd+IandCmd+Bto quickly highlight text
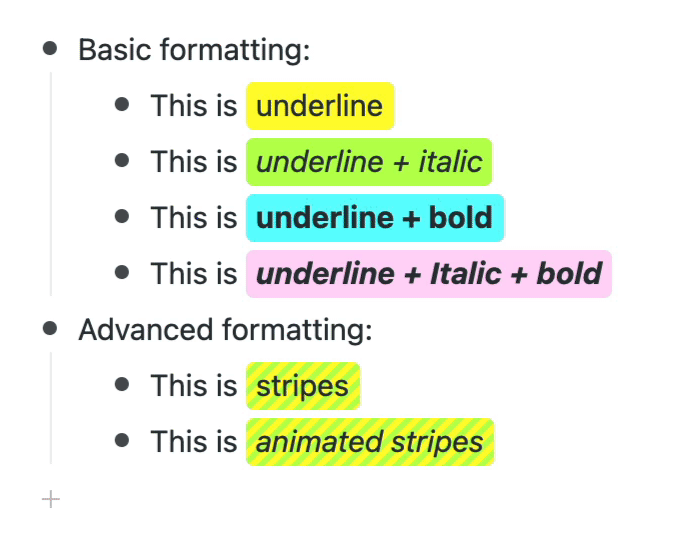
End result
Once installed and set up, WorkFlowy can look like this:
Stylesheets
Basic
Basic highlighting is achieved with the following rules:
:root {
  --pink: #ffd6f7;
  --orange: #ffdf37;
  --yellow: #fffb2f;
  --green: #baff50;
  --blue: #61fdff;
}

.content u {
  padding: 2px 5px 4px;
  text-decoration: none !important;
  border-radius: 4px;
  font-weight: normal;
  font-style: normal;
}

.content u {
  background: var(--yellow);
}

.content i u {
  background: var(--green)
}

.content b u {
  background: var(--blue)
}

.content b i u {
  background: var(--pink)
}
Advanced
More advanced effects can (though almost certainly shouldn't!) be added using more exotic CSS:
@keyframes slide {
  from { background-position: 0 0; }
  to { background-position: 8.49px 0; }
}

.content u {
  background: var(--stripes);
}

.content i u {
  background-image: var(--stripes);
  background-size: 8.49px;
  transition: 1s background;
  animation: slide .5s linear infinite;
}
Setting up Stylish
Install from the Chrome WebStore then open WorkFlowy.
On the extension's Action button in the toolbar (or in the extensions dropdown):
- Click the icon to show the popup
- Click the 3-dots at the top
- Click "Create New Style"
In the page that appears:
- Paste the CSS code above into the "Code" panel
- In the "Applies" section, click "Specify"
- Change "URL" to "URLs on the domain"
- Type "workflowy.com" (without the quotes) in the next field
To finish:
- Hit
Cmd+Sto save - Close the tab
Then start underlining!
Addendum
September 2021
WorkFlowy has released native highlighting so this hack is no longer needed... though the convenience of using system shortcut keys (you can also use Shift+Cmd+H) is not to be underestimated!
January 2022
A new project I'm working on takes the idea of hacking WorkFlowy formatting to a whole new level by turning WorkFlowy into a Markdown-compatible word processor.
I'll release more details as soon as I get time to work on the project again.